
Ozone Generator Parts Guide and Replacement Reference
Your ozone generator still powers on, but the output seems weaker. Or the fan runs while the treatment cycle does nothing. You find a replacement plate that looks right, then discover several nearly identical parts with different descriptions and no clear explanation of what fits.
Don't order by appearance. Ozone generator parts belong to a matched electrical, airflow, and control system. The right repair restores the documented operating configuration, not the strongest smell or the largest discharge plate.
Table of Contents
- Why Ozone Generator Parts Matter More Than They Look
- Ozone Generator Parts Map and How They Work Together
- Ozone Plates and Ozone Cells Explained
- High-Voltage Transformers and Inverters
- Control Boards, Timers, and Sensor Modules
- Fans, Housings, Check Valves, and Filtration Components
- Model Compatibility Across Alpine, EcoQuest, Living Air, and Vollara Families
- Replacement Intervals and Inspection Schedule
- Troubleshooting Weak Output and Failed Operation
- Where to Source OEM and Refurbished Ozone Generator Parts
- Quick Reference for Ozone Generator Part Replacements
- Safety, Compliance, and Re-Entry After Service
Why Ozone Generator Parts Matter More Than They Look
A visible plate is an easy component to blame. It's accessible, it gets dirty, and sellers often present it as the main service item. But a generator with a sound plate can still have a failed power supply, restricted airflow, damaged wiring, or controls that aren't responding correctly.
The exposure consequences make blind substitution a poor repair method. In an EPA study of ozone generators, each of three tested units exceeded OSHA's workplace exposure limit of 0.10 ppm averaged over eight hours; the same EPA guidance identifies NIOSH's recommendation of 0.10 ppm as a ceiling that shouldn't be exceeded at any time. Those are exposure references, not targets for household treatment.
Start with identification, not a shopping cart
Before buying anything, gather:
- Equipment identity: Photograph the model label, serial information, revision markings, and installed part.
- Operating complaint: Record whether the problem involves power, airflow, cycle control, physical damage, or measured output.
- Service instructions: Find the manufacturer's cleaning, replacement, and verification procedures.
- Application: Establish whether the equipment treats air, supplies ozone to water-treatment equipment, or serves an unoccupied remediation process.
Keep those records with the machine. They're more useful than a purchase history that says only “replacement ozone plate.”
Practical rule: A replacement should restore the original operating specification. An increase in output isn't proof of a successful repair.
Treat unfamiliar high-voltage assemblies as service work for a qualified technician. Power-off inspection can identify obvious damage, but it doesn't authorize improvised electrical testing or operation with protective covers removed.
Ozone Generator Parts Map and How They Work Together
Follow the air path and the electrical path separately. They meet at the ozone-producing cell, but a fault on either side can stop the system from performing correctly.
The diagram provides a component-level orientation, not a wiring diagram for every model.
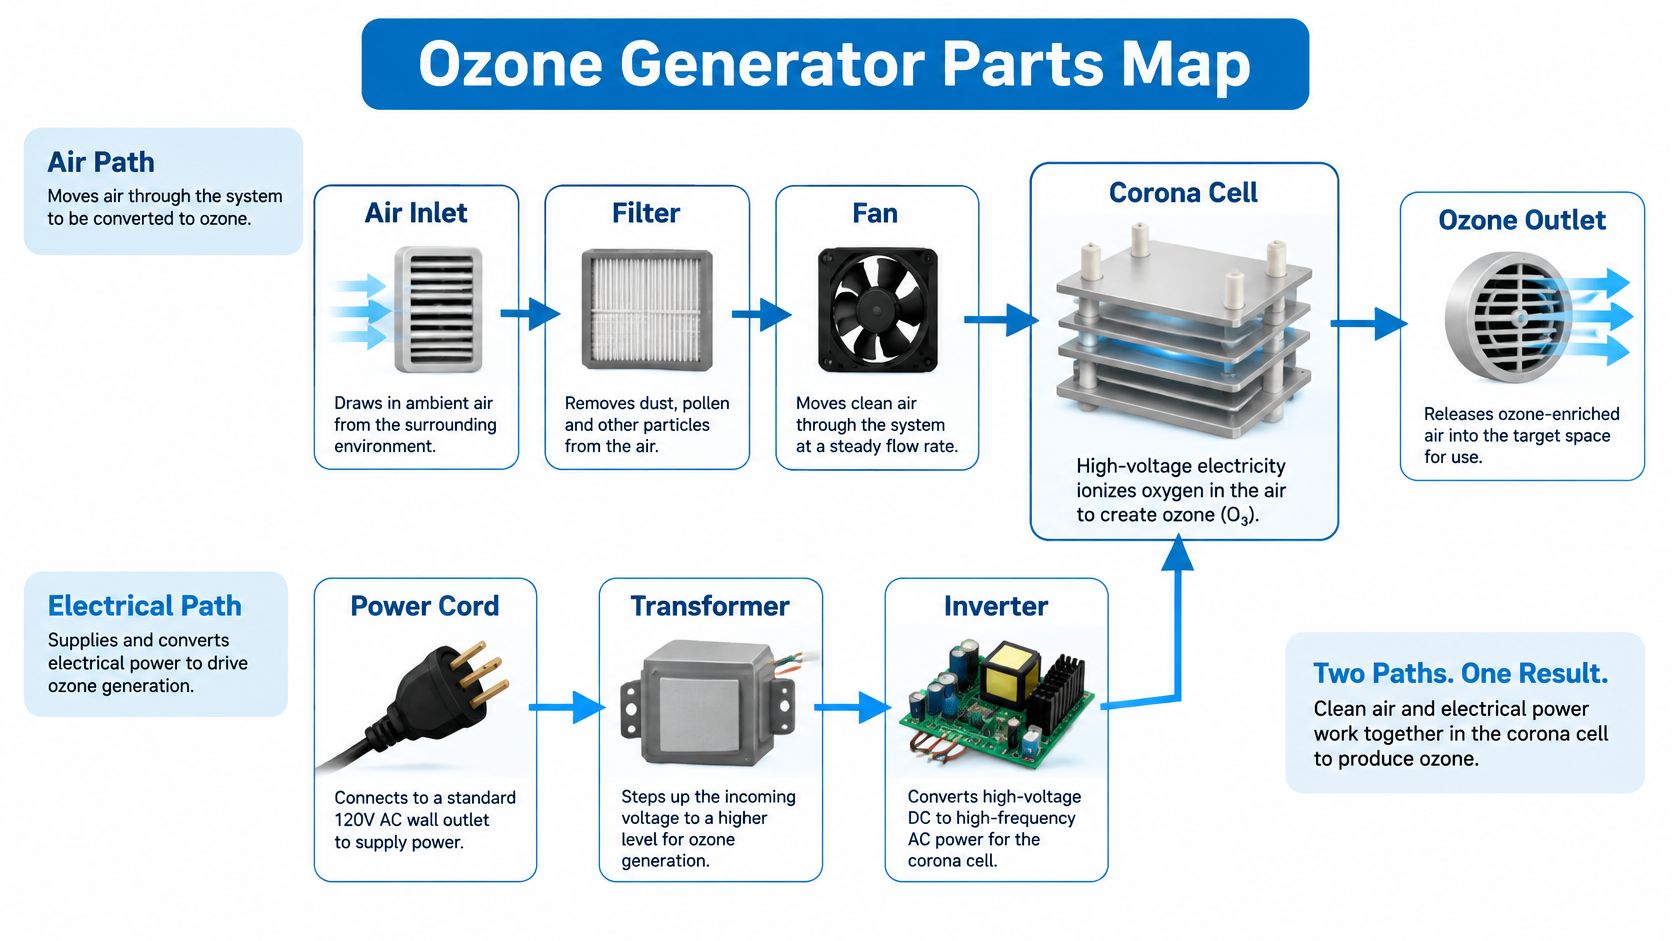
The air path
In a fan-driven air-treatment unit, inspect the inlet, any specified filter, the airflow passage around the discharge assembly, and the outlet. The fan's role can include moving treatment air and removing heat from internal components.
Don't assume every generator follows the same layout. Tubing and check valves belong to applicable delivery systems, particularly water-treatment arrangements, and aren't universal features of room-air equipment.
The electrical path
The incoming supply feeds the equipment's power and control components. Depending on the design, a transformer or inverter supplies the discharge assembly, while timers, switches, sensors, and interlocks govern operation.
| Subsystem | What to identify | Service question |
|---|---|---|
| Incoming power | Cord, inlet, specified protection | Is there visible supply-side damage? |
| Output stage | Transformer or inverter | Does the replacement match the original electrical specification? |
| Discharge assembly | Plate, cell, electrodes, dielectric | Is it clean, intact, and correctly installed? |
| Air management | Fan, filter, passages | Is the intended airflow path unobstructed? |
| Controls | Board, timer, sensors, interlocks | Can the system start, regulate, and stop as intended? |
Use this map to describe a fault accurately. “The fan runs but the treatment cycle won't start” gives a service technician something useful to investigate. “It needs a stronger plate” assumes the diagnosis before anyone has established the cause.
Ozone Plates and Ozone Cells Explained
The plate or cell is an electrical assembly, not merely a surface that produces ozone. Its dielectric barrier, electrodes, geometry, and mounting arrangement belong to the original discharge design.
The catalog screenshot gives a visual reference for a replacement plate listing.
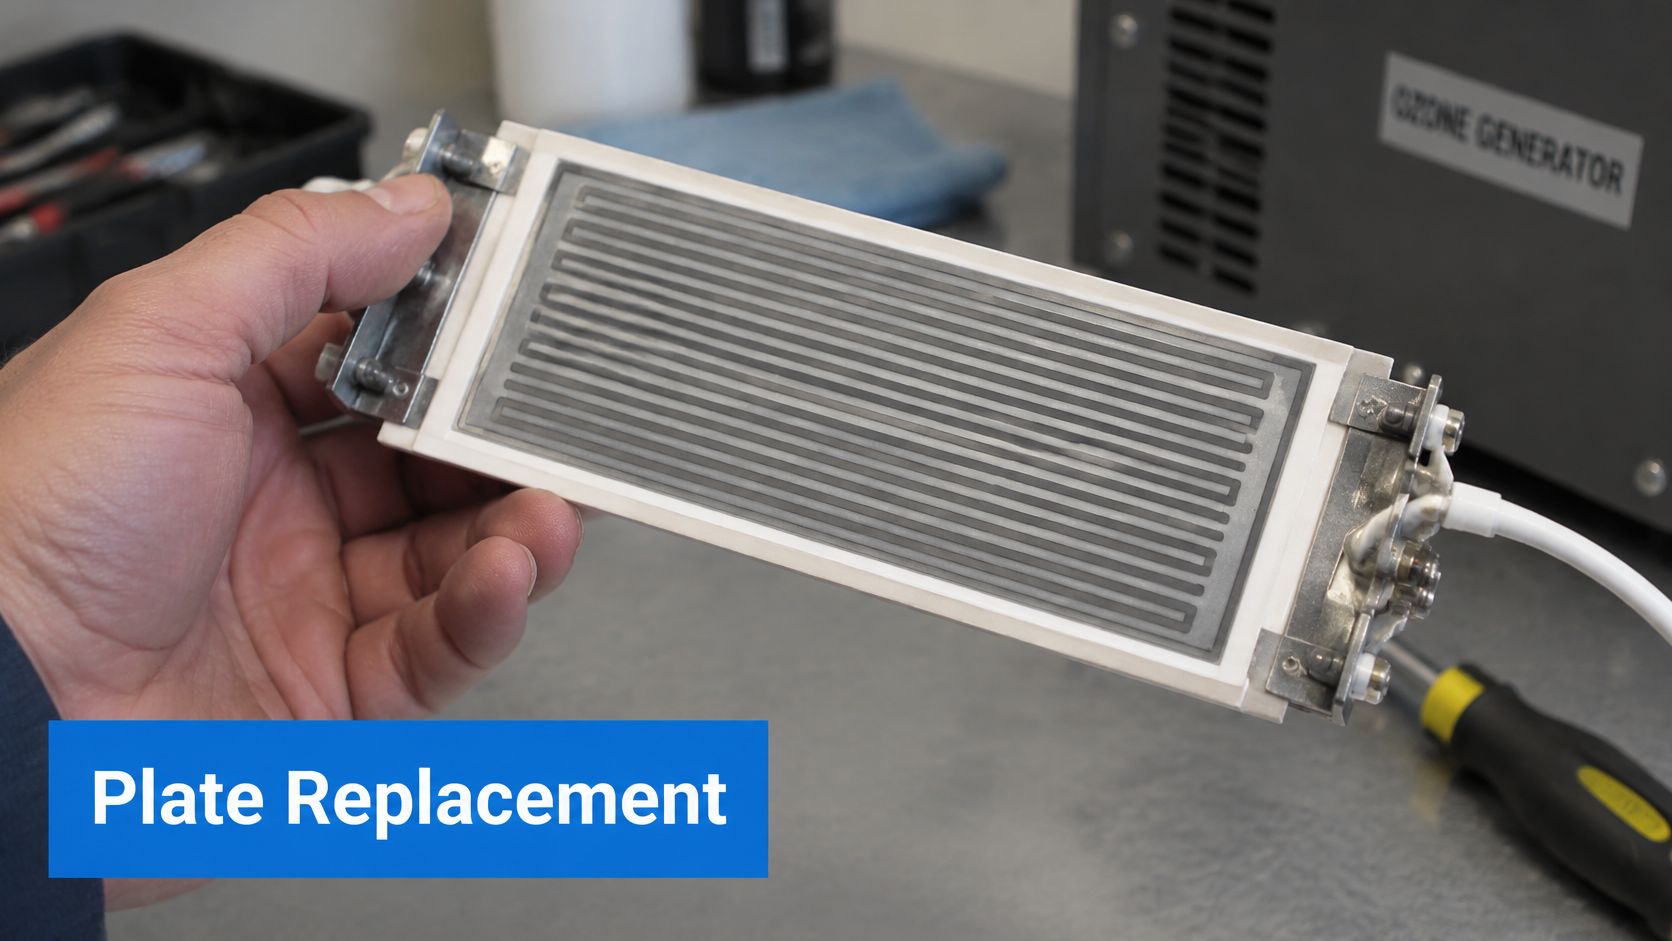
A dielectric is the insulating barrier within the discharge construction. When selecting a replacement, preserve the specified material, thickness, electrode arrangement, and clearances rather than treating matching outside dimensions as sufficient.
Standard doesn't mean universal
The Standard Ozone Plate catalog lists compatibility with named air-purifier models manufactured under Alpine, EcoQuest, Living Air, Vollara, Healthy Living, Spring Air, Lightning Air, and Natures Air labels. That's a defined fitment claim, not permission to install it in any generator carrying one of those brands.
Compare your equipment against the listing's model names and request clarification when the revision or installed assembly differs. Use the ozone plate catalog to locate candidates, then confirm the actual application before ordering.
- OEM replacement: Ask for the original part identification and any documented supersession.
- Aftermarket replacement: Require explicit fitment and electrical compatibility information.
- Heavy-duty alternative: Treat the description as a claim requiring documentation, not an automatic upgrade.
“Original Heavy Duty Ozone Plate” is not enough information to establish compatibility. Without a documented specification and fitment list, don't infer which models it serves or whether it changes the original output.
Inspect before deciding
Look for dielectric cracks, contamination, carbon tracking, damaged contacts, and arcing marks. Follow the equipment instructions for cleaning; don't substitute scraping, solvents, or abrasive methods just because they worked on another model.
A product demonstration can help with visual orientation, but it doesn't replace the service instructions for your machine.
High-Voltage Transformers and Inverters
A generic high-voltage supply isn't a safe substitute just because it fits the mounting holes. The output stage must suit the discharge assembly, insulation system, wiring, and controls.
This internal view illustrates why the power stage deserves attention alongside the plate.
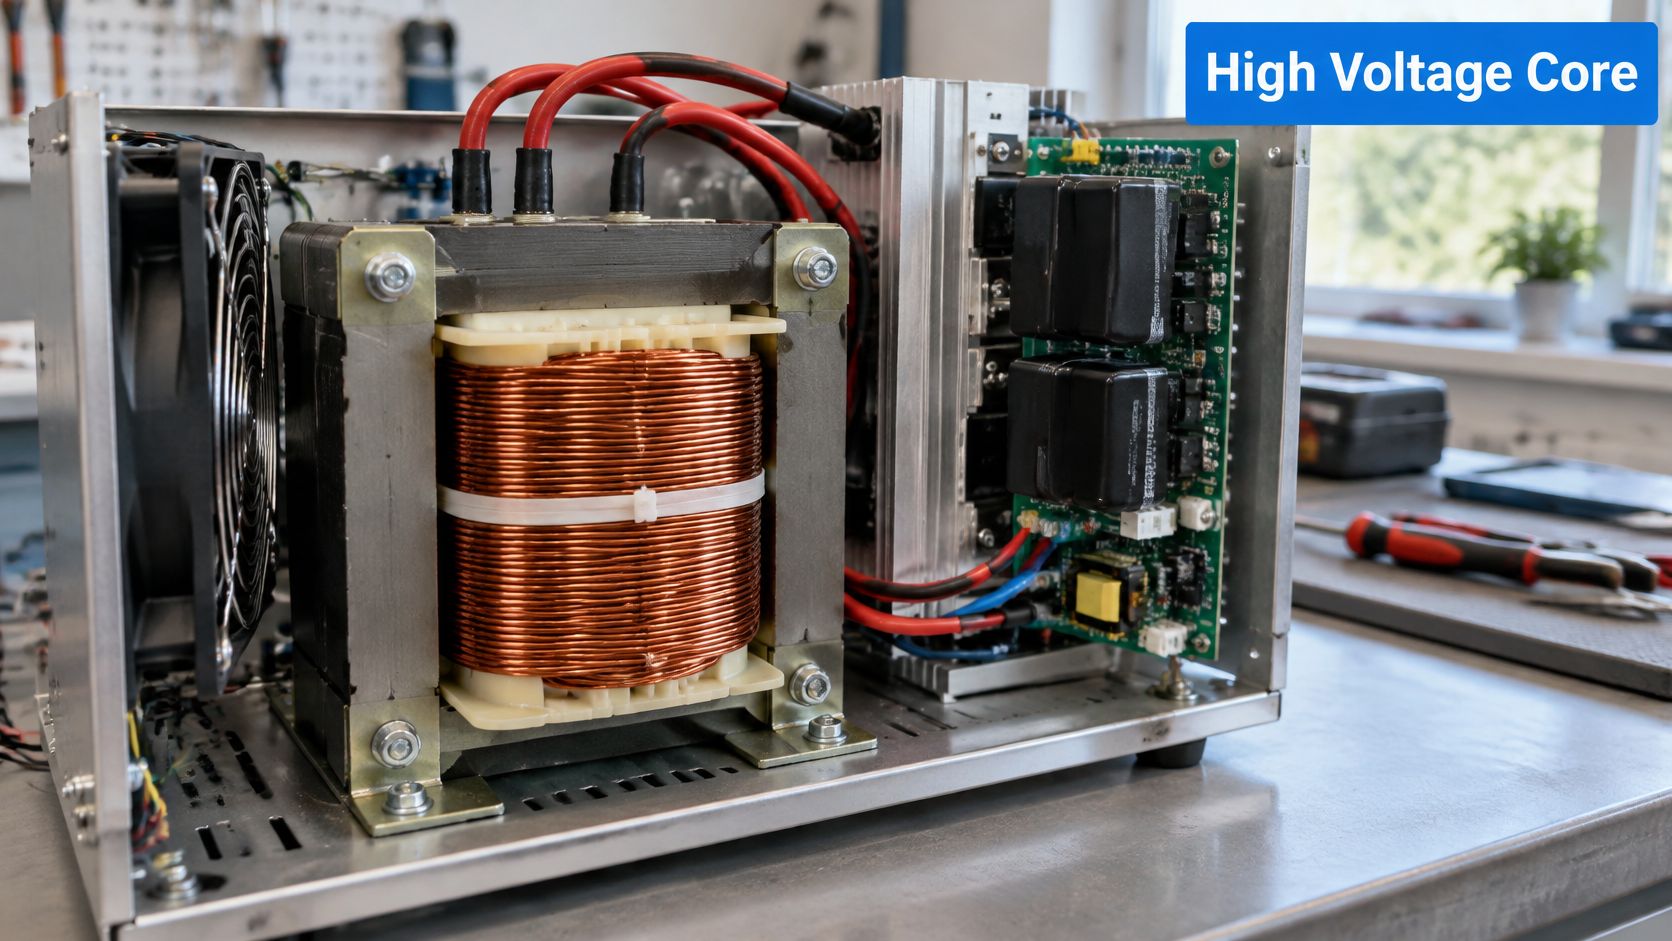
Changing operating frequency, electrode spacing, dielectric thickness, plate area, or airflow can alter ozone production, heat generation, and electrical stress. The system-level specifications and ozone-testing guidance support treating the discharge assembly, high-voltage supply, cooling, enclosure, and controls as a matched configuration.
What must match
Obtain written confirmation of the voltage and current range, operating frequency where specified, connector geometry, insulation rating, and mounting clearances. If the original assembly uses encapsulation or potting, don't assume an exposed replacement provides an equivalent insulation arrangement.
A running fan doesn't prove the high-voltage stage works. Conversely, absent output doesn't prove the transformer has failed, because control faults, wiring damage, and a defective discharge assembly can produce similar complaints.
| Evidence available | Sensible next action |
|---|---|
| Burned connector or damaged insulation | Stop operation and assess the associated wiring |
| Cracked or tracked discharge assembly | Resolve the assembly fault before condemning the supply |
| No visible damage, output still absent | Request manufacturer-specific electrical diagnosis |
| Proposed supply has incomplete specifications | Don't install it |
Keep the removed part's label photographs, connector orientation, and service findings with the order. Ask the technician to document the installed configuration and post-repair checks.
Don't probe an energized high-voltage assembly with ordinary troubleshooting assumptions. A replacement supply should be installed and verified using the manufacturer's procedure and suitable service equipment.
Control Boards, Timers, and Sensor Modules
A timer tells equipment how long to run. A working timer doesn't establish that ozone concentration remained acceptable. Sensors, feedback circuits, relays, and interlocks perform different jobs, and replacing one doesn't restore the others.
The distinction has a documented basis. An EPA-supported emissions study examined generators designed to control concentrations to 50 ppb and found that control-mode operation kept the research house below that level, usually substantially below it. That document also reports the FDA's 0.05 ppm limit for indoor medical devices and a historical EPA outdoor eight-hour standard of 0.08 ppm, which shouldn't be mistaken for a current indoor operating permission.
Identify the control strategy
Read the actual manual before assuming a machine monitors room concentration. A display, an automatic mode, or a timer knob doesn't establish the presence of an ozone sensor.
- Main board: Confirm model revision, connector assignments, and any required configuration.
- Timer or cycle controller: Verify the intended start, duration, and stop functions.
- Sensor module: Obtain its specified verification, calibration, and replacement procedure.
- Interlock: Identify what condition it monitors and what response the manufacturer requires.
- Relay or switching component: Confirm that the output stage stops when commanded.
A replacement plate won't correct a sensor that doesn't respond or a switching circuit that fails to stop production. Treat unexplained continued operation as a control fault, not as a minor inconvenience.
Don't bypass an unresolved fault
If the generator refuses to start because a protective condition is active, establish why. Don't bridge a switch, disconnect a sensor, or install a board intended for a different configuration to make the machine run.
A generator that starts reliably but can't stop reliably is not repaired.
After control work, require a functional check of the relevant shutdown and feedback functions. Keep the results with the part identification so the next service decision starts with evidence.
Fans, Housings, Check Valves, and Filtration Components
Lower-voltage parts still deserve exact specifications. Interchangeable should mean functionally equivalent and documented, not “close enough to attach.”
A fan replacement, for example, needs more than matching dimensions. Confirm the original electrical requirements, connector arrangement, airflow direction, mounting, and intended cooling function before accepting a substitute.
Inspect the supporting components
| Component | Inspection cue | Recommended decision |
|---|---|---|
| Fan and guards | Dust accumulation, damage, obstruction | Clean as instructed; replace damaged equipment with a specified equivalent |
| Housing and mounts | Distortion, loose supports, displaced insulation | Restore the intended clearances and assembly |
| Filter | Loading, damage, incorrect seating | Use the specified filter and installation orientation |
| Wiring harness | Discoloration, chafing, loose terminals | Have damaged wiring assessed before restarting |
| Tubing, where fitted | Moisture, kinks, deterioration | Correct the delivery-path problem using approved materials |
| Check valve, where fitted | Wrong direction or suspected backflow | Follow the equipment-specific inspection and replacement procedure |
Don't confuse an air-treatment cabinet with a water-treatment ozone delivery assembly. A check valve or tubing set suitable for one application doesn't become appropriate for the other merely because its connections fit.
Preserve the original arrangement
Photograph routing before disconnecting accessible components. Keep wiring away from the discharge assembly and preserve clips, guards, seals, and specified separation distances.
Filters require the same discipline. Don't add an improvised filter stage or substitute a denser medium without approval, because the original system depends on its designed airflow.
A cracked housing or missing protective panel also isn't cosmetic. Return the enclosure to its intended condition before operational verification, rather than testing a partially assembled machine and calling it finished.
Model Compatibility Across Alpine, EcoQuest, Living Air, and Vollara Families
Brand overlap isn't the same as universal interchangeability. The catalog plate's fitment spans named models under several manufacturer labels, but that doesn't establish that every internal component crosses between those machines.
Use the matrix as a catalog lookup, then verify the exact model and revision. The heavy-duty column deliberately separates documented fitment from information that still needs confirmation.
Ozone Plate Compatibility Across Common Air Purifier Models
| Model Family | Manufacturer Labels | Standard Plate | Heavy Duty Plate |
|---|---|---|---|
| Fresh Air, Fresh Air Double Plus | Catalog label group below | Listed | Confirmation required |
| Classic | Catalog label group below | Listed | Confirmation required |
| XL-15, XL-15C, XL-15S | Catalog label group below | Listed | Confirmation required |
| Breeze, Breeze AT | Catalog label group below | Listed | Confirmation required |
| Flair, 880 | Catalog label group below | Listed | Confirmation required |
| Ozone Blaster | Catalog label group below | Listed | Confirmation required |
| Eagle 2500, Eagle 5000 | Catalog label group below | Listed | Confirmation required |
| Salon Air | Catalog label group below | Listed | Confirmation required |
The catalog's manufacturer-label group comprises Alpine, EcoQuest, Living Air, Vollara, Healthy Living, Spring Air, Lightning Air, and Natures Air. The listing doesn't provide a separate manufacturer-to-model crosswalk, so don't infer one from the table.
Match the label string
“Classic” and a vaguely similar cabinet aren't sufficient identification for a transformer, sensor, or board order. For that family, begin with the Living Air Classic parts reference and compare the installed component against the available documentation.
- Exact model: Preserve suffixes and additional wording.
- Revision details: Include label photographs and connector views.
- Installed assembly: Record markings rather than relying on the cabinet badge.
- Unclear history: Tell the supplier if a previous owner may have modified the machine.
A shared plate listing establishes only the stated plate compatibility. It doesn't justify moving a control board or high-voltage supply between model families without separate confirmation.
Replacement Intervals and Inspection Schedule
There's no defensible universal replacement interval for ozone generator parts. Use the manufacturer's service schedule, operating history, and component condition rather than adopting a generic calendar.
The chart below is a general visual checklist. Any fixed intervals shown require confirmation against your equipment's manual; they aren't a model-specific service specification.
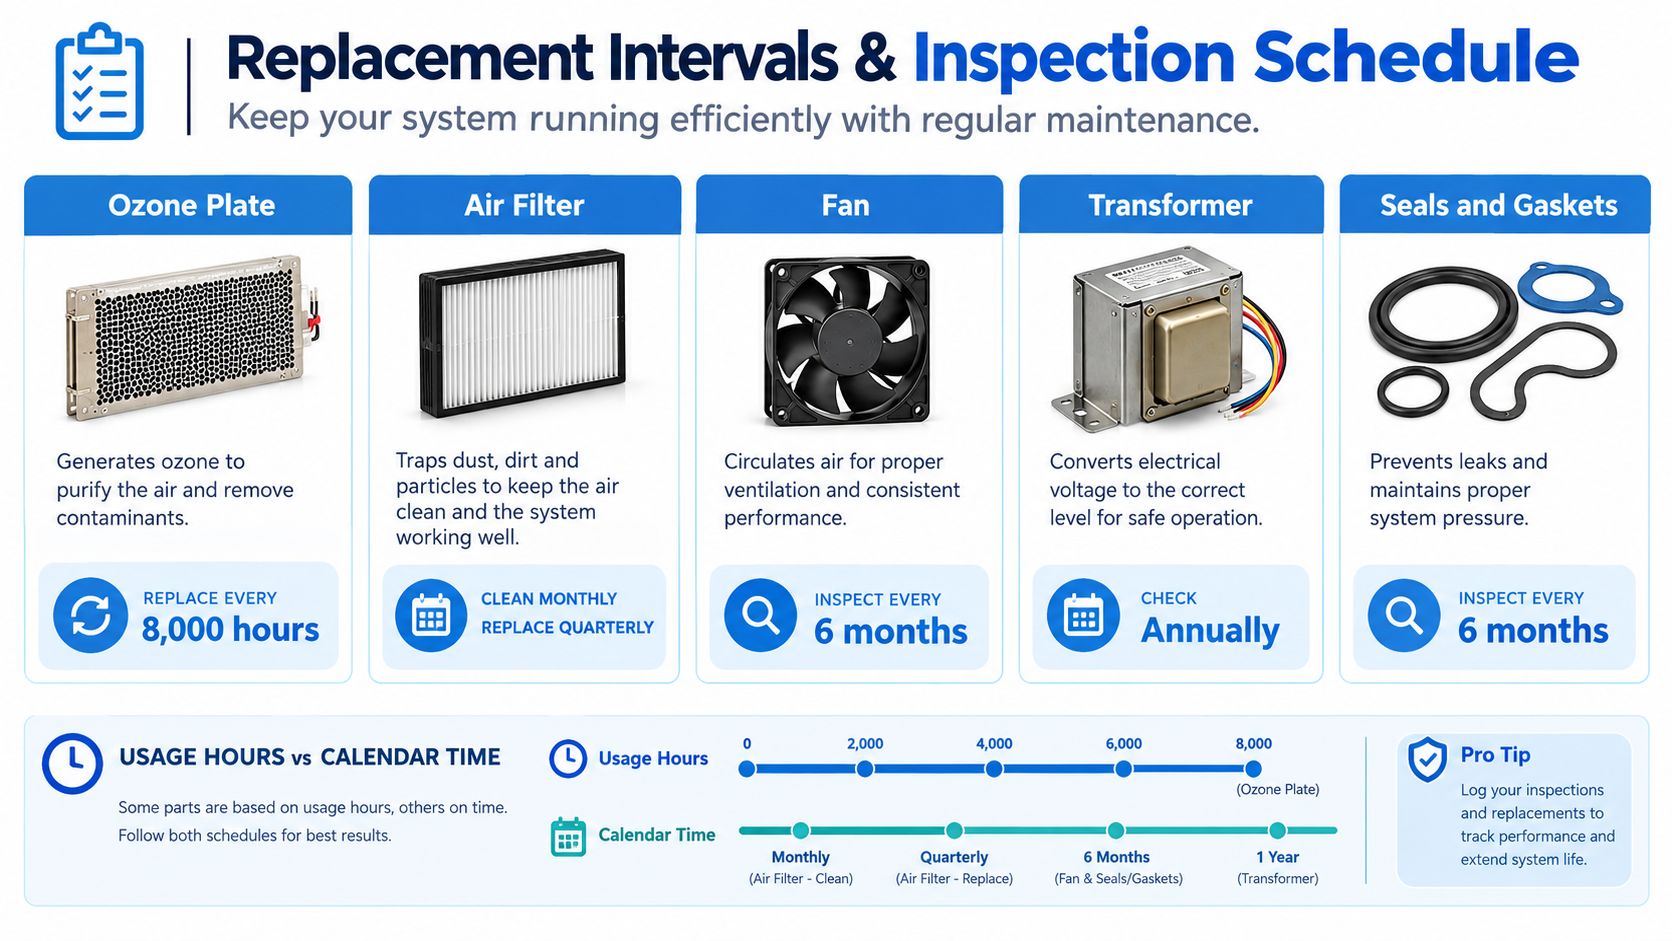
Build the schedule around evidence
Separate inspection, cleaning, and replacement in your maintenance record. Cleaning an intact component and replacing a cracked one are different service decisions.
| Part | Schedule basis | Condition that needs action |
|---|---|---|
| Plate or cell | Manufacturer instructions and recorded use | Cracks, tracking, damage, or contamination requiring approved cleaning |
| Filters | Specified service schedule and loading | Damage, heavy loading, or poor seating |
| Check valves and tubing | Application-specific instructions | Backflow concern, moisture, deterioration, or incorrect routing |
| Fan | Manufacturer inspection requirements | Obstruction, damage, unusual noise, or poor operation |
| UV lamp, if fitted | The lamp's documented service requirements | Specified replacement point or failed operation |
| Wiring and seals | Scheduled inspection and service access | Discoloration, brittleness, looseness, or deterioration |
Dust, humidity, and operating duty should inform inspection frequency. Record those conditions instead of assuming that occasional home use and continuous commercial duty produce the same service needs.
Keep a useful maintenance log
Record the date, operating-hour reading if available, condition found, cleaning method, replacement identification, and verification result. Photograph deterioration so the next inspection has a comparison.
Don't use smell to decide whether a scheduled replacement is due. Treat an unfamiliar odor as a reason to stop and investigate, not as an invitation to approach the outlet and perform a stronger sniff test.
Troubleshooting Weak Output and Failed Operation
Weak-smelling output is not a diagnosis. Start with the observable fault and use only checks the manufacturer permits with power disconnected.
A useful example comes from the DEL Eclipse service manual, which identifies an ozone module, indicator light, and check valve as a concurrent replacement set. That instruction applies to the documented equipment, not every generator, but it shows why replacing the most visible component can leave the service job incomplete.
If the machine won't power on
- Supply-side inspection: With the unit disconnected, inspect the cord, plug, inlet, and accessible external components for damage.
- Assembly check: Confirm user-serviceable covers and components are installed as the manual requires.
- Unresolved failure: Send the unit for diagnosis rather than repeatedly restarting it or bypassing protective devices.
Don't replace a plate to fix a machine that has no power. Establish whether the fault lies in the incoming supply, switching, protection, or control system.
If the fan runs but output is questionable
| Observation | Safe first check | Next action |
|---|---|---|
| Airflow seems restricted | Inspect accessible filters and passages while disconnected | Clean or replace as instructed |
| Plate looks contaminated | Inspect under the permitted service procedure | Use only the approved cleaning method |
| Plate has cracks or tracking | Stop using the assembly | Obtain the specified replacement |
| Water-treatment tubing contains moisture | Inspect routing and valve direction | Correct the delivery-system fault |
| No visible cause | Review fault indicators and service history | Request output-stage and control diagnosis |
If operation stops unexpectedly
Read the fault indication before replacing parts. A sensor response, interlock condition, or control failure requires a different repair from a depleted discharge module.
Diagnostic priority: Find the failed function before choosing the replacement component.
Finish with manufacturer-specific output verification, not a stronger odor or a brighter discharge. If you can't verify the result with the prescribed method, the repair remains unconfirmed.
Where to Source OEM and Refurbished Ozone Generator Parts
Buy from a supplier who can explain why the part matches, not merely confirm that it resembles your photograph.
Start with the original manufacturer or a documented authorized channel. A specialist parts supplier or refurbisher can also be appropriate, provided they identify the assembly and explain the inspection or repair work behind it.
Ask for the evidence before paying
- Identification: Exact part designation, compatible model, revision, and any superseded reference.
- Electrical specification: Applicable voltage, current, frequency, insulation, and connector details.
- Mechanical specification: Mounting arrangement, clearances, and discharge-assembly configuration.
- Condition: New, used, repaired, or refurbished, with a clear description of what that means.
- Verification: The functional checks performed and the documentation supplied.
- Application limits: Any restrictions affecting emissions, intended use, or installation.
For a repair-versus-replacement assessment, the publisher's ozone generator repair service is one available route. Use the same documentation requirements you'd apply to an OEM service department or independent repair shop.
Refurbished isn't a test result
A cleaned enclosure doesn't establish that a transformer, board, or sensor has been evaluated. Ask which components were inspected, which were replaced, and how the assembled equipment was checked.
Reject listings that promise universal fit without specifications. Also reject an output-increase claim presented as proof of compatibility, especially when the seller can't identify the original configuration.
A supplier who requests model-label photographs is doing useful work. Send them clear information, and get unresolved compatibility questions answered in writing before installation.
Quick Reference for Ozone Generator Part Replacements
Use this lookup to choose the next service action, not to authorize a part purchase from a symptom alone.
| Complaint | Components to investigate | First action | If unresolved |
|---|---|---|---|
| No power | Cord, inlet, switching, control assembly | Disconnect and inspect accessible supply components | Qualified electrical diagnosis |
| Restricted airflow | Filter, fan, passages | Inspect for loading or obstruction | Confirm fan specification and operation |
| Questionable output | Plate, delivery path, supply, controls | Follow the diagnostic checks above | Manufacturer-specific verification |
| Repeated shutdown | Sensor, interlock, control board | Record the fault indication | Diagnose the shutdown condition |
| Visible electrical damage | Wiring, dielectric, connectors | Stop use | Assess the complete affected assembly |
| Moisture in delivery tubing | Tubing, check valve, installation | Inspect the documented delivery arrangement | Application-specific service |
Terms worth knowing
- Corona discharge: The high-voltage discharge process used in the equipment covered by this guide.
- Dielectric barrier: The insulating element within the discharge assembly.
- OEM: Original equipment manufacturer.
- Interlock: A control that permits or prevents operation according to a defined condition.
- Feedback control: A system that uses a measured condition to adjust operation.
- ppm and ppb: Parts per million and parts per billion, concentration units that must be read carefully.
- NOx: Shorthand for nitrogen oxides, not a synonym for every possible ozone-related by-product.
Keep these documents together
Maintain the equipment manual, wiring information supplied for service, parts-fitment confirmation, replacement records, and operational verification results. For water-treatment equipment, include the delivery-system instructions rather than relying on an air-purifier reference.
Write unresolved findings plainly. “Output not verified” is more useful than “seems better,” because the next technician can distinguish completed work from assumptions.
Safety, Compliance, and Re-Entry After Service
A functioning generator is not automatically a safe generator. Mechanical completion and safe return to service are separate decisions.
California's indoor air-cleaning device regulation limits covered devices to 0.050 ppm ozone and requires relevant manuals to recommend ventilating enclosed spaces for at least one hour before reoccupation. That ventilation instruction isn't a guarantee that a particular room is ready for entry.
The same regulatory framework states that ozone isn't an effective indoor-air cleaner at concentrations safe for human occupation. Don't turn an occupied-space unit into a higher-output treatment machine by installing a larger plate or modifying its controls.
Separate occupied operation from remediation
For homes, offices, childcare facilities, and healthcare environments requiring continuous occupied operation, choose an appropriately specified non-ozone air-cleaning approach. Don't treat an intentional ozone-remediation cycle as ordinary occupied-room purification.
Unoccupied remediation needs its own controlled procedure. Keep people out, prevent unintended entry, follow the equipment's application instructions, and establish how the space will be ventilated and cleared before occupancy resumes.
Ozone can also react with indoor chemicals and create harmful by-products. Don't assume that reducing the ozone concentration alone proves every treatment-related concern has been resolved.
Complete the return-to-service record
- Configuration: Record the installed plate or cell, power stage, control revision, and relevant delivery components.
- Assembly: Confirm wiring routing, insulation, mounting, enclosure condition, and airflow.
- Control response: Verify applicable sensors, timers, shutdown functions, and interlocks.
- Output verification: Use the manufacturer's prescribed method and suitable measurement equipment.
- Re-entry procedure: Apply the relevant ventilation, measurement, and access-control requirements.
- Handover: Give the owner the service findings and operating restrictions.
Don't release the equipment as ready because the indicator light illuminates or the outlet has a familiar odor. If the required verification can't be completed, label the status clearly and keep the equipment out of service until the missing checks are resolved.
EcoQuest Purifiers offers replacement ozone plates, other purifier components, and repair services for identifying the right service path. Visit EcoQuest Purifiers with your model-label photographs, installed-part markings, and fault description, and request compatibility confirmation before ordering.