
Whole House Filter Leaking: How to Fix It
You notice water pooling beneath the equipment, or hear a faint spray whenever someone opens a tap. The label says “whole house filter,” but that name can describe two very different problems: a pressurized water-filtration housing or an HVAC air-filter cabinet with condensate nearby. The repair path depends on identifying which one is wet.
Treat a water leak as an active plumbing failure, not a minor appliance nuisance. A dry HVAC cabinet with air escaping around the filter needs an airflow diagnosis, while visible water near the cabinet may come from a drain pan or condensate line rather than the filter itself.
Table of Contents
- Immediate Safety Steps and Damage Risks
- Depressurizing and Inspecting Water Filter Seals
- Diagnosing Pressure Transients and Water Hammer
- Evaluating Flow Restriction and Cartridge Stress
- Troubleshooting HVAC Air Filter and Condensate Leaks
- When to Call EcoQuest Repair Service
Immediate Safety Steps and Damage Risks
Start by stopping the source. For a water-filtration unit, close the filter's inlet or bypass valve if it has one. If it doesn't, shut off the home's main water supply, then open a cold faucet downstream to reduce pressure. Don't loosen the sump, fitting, or pressure-relief button while the housing remains under full line pressure.
For an HVAC cabinet, switch the system off at the thermostat and disconnect power at the service switch if water is near electrical components. Put down towels or a container, move stored items away from the area, and photograph the wet connection before disassembly. Water around the filter cabinet can travel into flooring, drywall, insulation, or the air handler before the original drip looks serious.
Practical rule: Stop the flow first, identify the source second, and repair only after the equipment is depressurized or powered down.
The surrounding plumbing risk is larger than the filter itself. Water damage and freezing represented approximately 19.5% of homeowners' insurance losses in North America, and water damage was the second-most frequent homeowners' insurance claim category during 2013–2017, according to the Chubb water-damage prevention guide. The same source notes that a crack only 1/8 inch wide can release about 250 gallons in one day.
Insurance figures combine many types of residential plumbing failures, so they aren't a failure rate for whole-house filters. They do show why a leaking housing, O-ring, valve, or threaded fitting deserves immediate attention. If the filter is installed above finished flooring, behind cabinetry, or near a slab edge, contacting trusted San Antonio plumbers for leak detection can be safer than allowing a concealed connection to run unattended.
Depressurizing and Inspecting Water Filter Seals
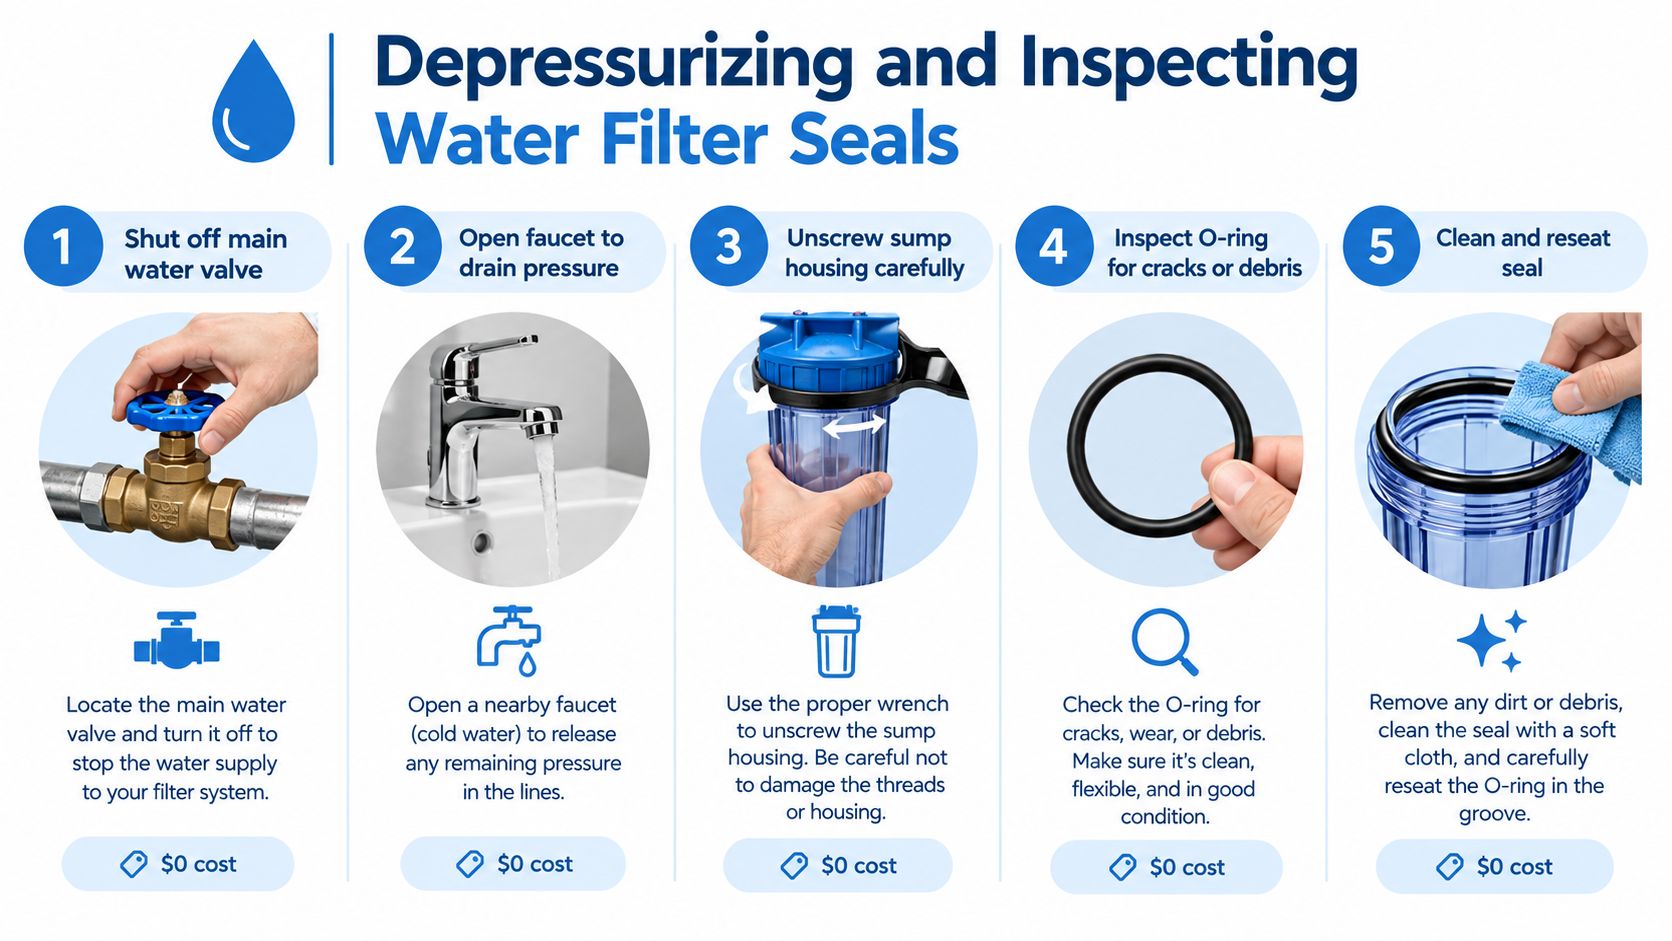
Most sump leaks come from the seal interface, not from the cartridge itself. A dry, twisted, flattened, dirty, or incorrectly sized O-ring can allow water to pass at the housing seam, while cross-threading can prevent the sump from seating squarely.
Use a controlled opening sequence
- Close the inlet or main valve. Confirm that the supply is off by opening a nearby cold faucet.
- Release trapped pressure. Press the housing's pressure-relief button if fitted. Keep a bucket under the sump because the housing will still contain water.
- Loosen the sump carefully. Use the correct housing wrench only after the pressure has been relieved. Lower the sump straight down instead of twisting it sideways.
- Remove the cartridge and inspect the seal. Look for cuts, flattened sections, mineral deposits, grit, and a ring that has jumped out of its groove.
- Examine the plastic. Check the sump, cap, threads, and sealing edge for hairline cracks. A cracked housing isn't a lubrication problem and shouldn't be put back into service.
Clean the groove and both sealing surfaces with a lint-free cloth. If mineral scale is present, remove it without gouging the plastic. Install the correct replacement ring, apply only a thin film of clean silicone grease, and seat it evenly. A suitable replacement O-ring should match the housing's dimensions, such as the Living Water 1/8-inch O-ring, but confirm compatibility with your specific housing before ordering.
Reinstall the sump by hand. The O-ring makes the seal, so excessive wrench force can distort the ring, damage plastic threads, or create a new crack. Restore water slowly, vent trapped air, and inspect the seam through a complete pressure cycle. If the joint still leaks, shut the supply off again rather than repeatedly tightening it.
A water-filter repair and an indoor-air product serve different purposes. For example, the Living Air Classic XL-15 Air Purifier is a filterless air purifier using ionization and activated oxygen technology, so it isn't a substitute for repairing a pressurized water housing.
Diagnosing Pressure Transients and Water Hammer
A replacement O-ring won't solve a pressure problem. If the housing stays dry while the supply is isolated but begins dripping when a washing machine, dishwasher, or irrigation valve operates, investigate pressure changes before installing another seal.

Household water lines remain pressurized, including the lines serving treatment equipment. Manufacturer installation guidance warns that incoming pressure above 60 psi may require pressure reduction, and it describes overnight pressure increases of 1–4 bar as well as water hammer when flow starts or stops, as detailed in this Aquasana whole-house installation guide.
Test when the leak happens
Record the timing rather than relying on a single visual inspection. Is the drip constant, or does it appear after the water heater cycles, a toilet refills, a washing machine shuts its valve, or the filter is brought back online? A constant leak at the sump points toward the seal, threads, or housing. A leak tied to a specific event points toward a pressure transient or water hammer.
A pressure gauge can show static pressure while no fixture is running. Dynamic pressure requires observing the gauge as water flows. Comparing those conditions helps reveal whether the housing is being stressed during demand or valve closure. Where possible, gauges upstream and downstream of the filter also show whether the cartridge is adding excessive resistance.
A housing that leaks only during an event is giving you a timing clue. Don't erase that clue by tightening the sump until the plastic deforms.
If pressure spikes are confirmed, a plumber may need to evaluate the pressure-reducing valve, expansion control, or water-hammer protection. The correct fix depends on the plumbing layout and supply conditions. A homeowner can document the pattern, isolate the filter, and check visible connections, but should leave pressure-control changes to someone who can test the entire system.
An air purifier addresses indoor air, not line pressure. The EcoRoom Plug-In Air Purifier for Small Rooms is a compact wall-plug air cleaner for spaces such as bedrooms, bathrooms, and offices, so it has no role in stopping a plumbing leak.
Evaluating Flow Restriction and Cartridge Stress
A clogged cartridge can turn a flow problem into a seal problem. Sediment, scale, an overly fine cartridge, or a housing that is too small for the household demand can create a large pressure difference across the filter. That pressure difference loads the upstream fittings and exposes the weakest connection.
Ferguson's trade guidance identifies a pressure drop greater than 15 psi across the housing as evidence that the media may be clogged and restricting flow, as explained in its water-filter maintenance guidance. The figure is a diagnostic threshold, not permission to keep operating a visibly damaged system.
Compare the filter in service and bypass
With suitable gauges installed, compare inlet and outlet pressure while water is flowing. A growing difference suggests restriction. If the system has a bypass, using it briefly can help confirm the diagnosis: if flow returns while the filter is bypassed, inspect the cartridge and housing for loading, scale, or an incorrect specification.
Bypass isn't a permanent repair. Unfiltered water will pass through the home, and the underlying restriction remains. Shut the system down before opening it, then check whether the cartridge is heavily loaded with sediment, whether mineral deposits occupy the sealing area, and whether the replacement cartridge matches the housing and intended flow.
The Living Water replacement filter can be considered only after verifying the correct model and application. Cartridge selection is a trade-off: finer media may target smaller particles, but it can also restrict flow sooner in a high-sediment supply. Well-water users and occupants of older homes should pay close attention to changing flow, visible sediment, and recurring pressure symptoms rather than choosing a cartridge by appearance alone.
Troubleshooting HVAC Air Filter and Condensate Leaks
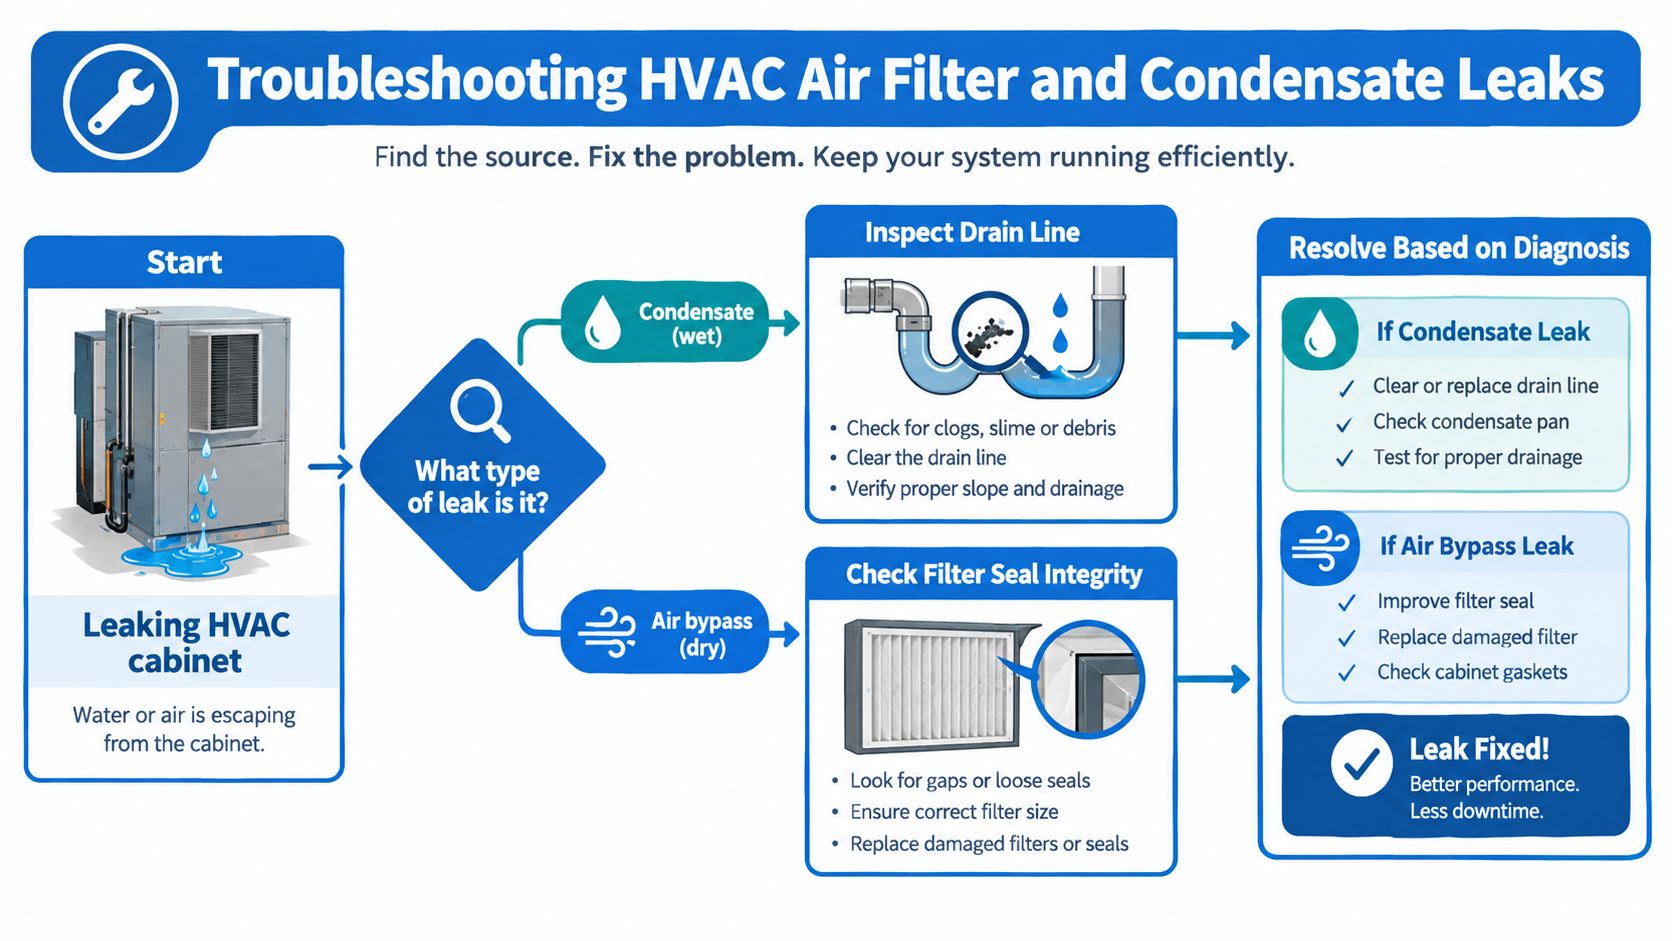
An HVAC “filter leak” often isn't a water-filter failure at all. First determine whether the cabinet is dry and leaking air or wet from condensate. Those conditions require different repairs, and replacing an air filter won't clear a blocked drain.
Dry cabinet and air bypass
Turn the blower off before inspecting the cabinet. Check the arrow on the filter, its dimensions, gasket compression, access-panel seal, cabinet seams, and duct transitions. The filter should slide in without force while maintaining continuous contact with the gasket.
Seal cabinet-to-duct joints with approved mastic or foil tape. The access panel needs a flexible, airtight gasket. PNNL guidance identifies a gasketed filter access panel as necessary for preventing air leakage in its heat-pump replacement checklist.
Excessive resistance from a dirty, overly restrictive, or incorrectly sized filter can increase static pressure and push air through weak seals. A digital manometer can measure total external static pressure at the return and supply plenums. Residential field guidance commonly cites a maximum around 0.5–0.8 inches of water column, but the air-handler manufacturer's limit controls.
Wet cabinet and condensate
If water is present, inspect the evaporator-coil drain pan, condensate trap, and drain line separately. A blocked drain, failed trap, or pan problem can place water near the filter cabinet and make the filter look responsible. Don't seal over a wet cabinet until you know where the water is coming from.
Higher-efficiency filter grades also involve airflow trade-offs. For background on the distinction between HEPA 13 and HEPA 14, consult Eco Clean Solutions on HEPA grades, then match any filter choice to the air handler's approved specifications rather than assuming the highest grade is automatically suitable.
When to Call EcoQuest Repair Service
DIY work is reasonable when the leak is accessible, the water is shut off, the housing is intact, and the problem is visibly limited to a dirty or misplaced O-ring. It stops being a sensible homeowner repair when water sprays, the housing is cracked, the connection is buried, or the leak continues after controlled depressurization and correct seal installation.
Use this decision point:
- Reseal it yourself: The sump seam drips, the valve isolates completely, the housing isn't cracked, and you can identify the correct O-ring.
- Pause and investigate: The leak appears only during appliance cycles, pressure changes, or filter operation. Measure or arrange testing for static and dynamic pressure.
- Call a professional promptly: Water sprays under pressure, the connection is inaccessible, electrical equipment is wet, or the housing or head is damaged.
- Stop using the equipment: A bypassed filter restores flow but the cartridge repeatedly loads, the system has persistent restriction, or the source can't be confirmed.
A leak sensor beneath the equipment can provide an early warning, while an automatic shutoff can limit discharge when the installation is near finished flooring or stored belongings. Test those devices as part of routine maintenance. Also inspect the filter after every cartridge change, not only when the pressure problem becomes obvious.
If the unit is an air purifier rather than a plumbing filter, use a service provider familiar with the model and its electrical components. EcoQuest repair services can be considered for purifier-related equipment, while a licensed plumber or HVAC technician remains the appropriate choice for pressurized water, condensate, duct, and static-pressure faults.
EcoQuest Purifiers offers air-quality products, replacement parts, and repair services for indoor environments, including whole-house and room purifiers and HVAC-integrated solutions. Visit EcoQuest Purifiers to identify the right equipment or service path, and keep plumbing or HVAC professionals involved when the leak involves pressure, condensate, or inaccessible connections.